My first peloton bike calibration took several hours and back-and-forth emails with the peloton support because I didn’t know what I was doing.
Luckily for you, this guide will explain everything I’ve learned and show you how to calibrate the peloton for higher output.

As a whole, the peloton bike needs to be calibrated to provide the most accurate feedback on the resistance to your bike software. The bike calibration works by adjusting the amount of space between the magnet brackets and the flywheel.
Also, I will touch on some common reasons why you should calibrate your bike on regular basis.
What does Peloton bike calibration mean?
As a whole, the peloton bike calibration means assigning resistance numbers from 1 to 100 between the position of the resistance knob to the distance between the magnet brackets and flywheel.
These numbers will provide feedback on the peloton screen.
Having a properly calibrated bike means that the values from the resistance match the actual output.
If your output is higher than normal, it means your bike is under-calibrated. If your numbers seem too low, it means your bike is over-calibrated.
Take a look at the graph below.
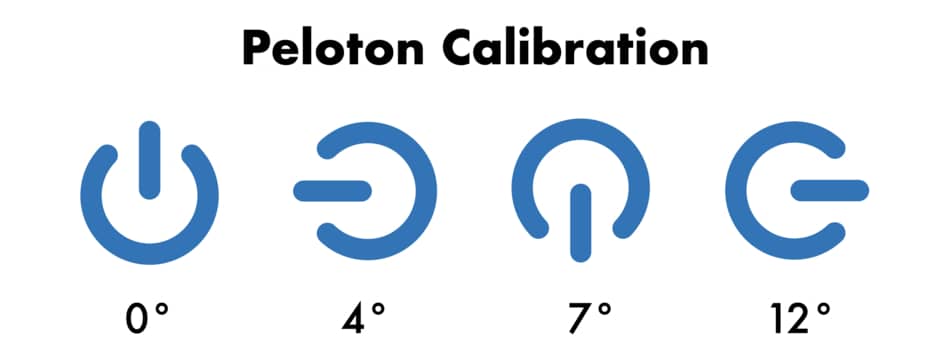
As you can see, each quarter-turn of the knob corresponds to approximately 3-4 resistance points, and one full 360-degree turn corresponds to 15 points.
How to tell if the peloton is calibrated?
One of the ways to know if your peloton bike is calibrated correctly is by checking your resistance knob.
If you turn your knob to the far right (until you can’t turn any further) it should show you 100 on the screen. If it doesn’t, you need to calibrate your bike.
Another way to know if your bike is ready for recalibration is when you notice the numbers are off.
For example, if you notice that you getting stronger, but your numbers are going down, it’s a good time to recalibrate your bike.
In the next graph, you can see an example of the wrong calibration.
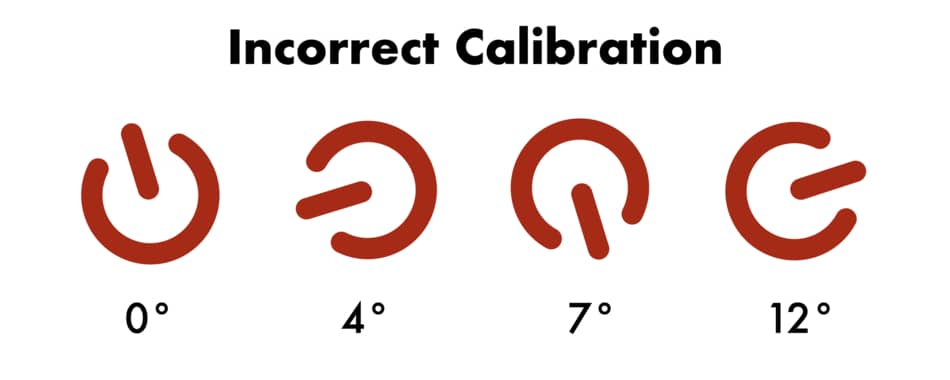
As you can see, the values from the resistance don’t match the position of the knob. With an incorrectly calibrated bike, the sensor control can indicate 100% resistance when it physically only reaches 75%.
This provides inaccurate data about your resistance and other metrics.
Is Peloton Calibration Important?
You bet.
Peloton calibration is important because it gives you a realistic number of your effort.
An uncalibrated bike sends wrong information about your output, which is then translated into inaccurate FTP, leaderboard position, and even inaccurate calorie expenditure.
Of course, it is not a deal-breaker if your bike is not calibrated correctly. You can still take every class, get fit and have fun, even without a precisely calibrated bike.
Peloton calibration impacts other metrics
Keep in mind that multiple metrics from the peloton dashboard (list below) are directly related to your resistance numbers and correctly calibrated bike.
1. Average output
Your average power output is dependent on cadence and resistance. Inexact calibration will either lower or increase the resistance, which will impact the average output.
2. Total output
Your total output is the sum of your average output (in watts) multiplied by time (in seconds).
3. Calories burned
Peloton bike calculates calories using the metabolic equivalent (METs), which is based on the power output. Inaccurate resistance (aka bad calibration) will lead to the wrong calorie expenditure.
4. FTP score
The peloton FTP score is the average power output (in watts) done in the 20-minute class multiplied by 0.95. Under or over-calibrated bikes will provide imprecise numbers.
5. Leaderboard position
The peloton leaderboard assigns you a position on the list based on your total output. If the bike is not calibrated correctly, your leaderboard position will either go up or down.
As you can see, having your bike operate correctly is not just affecting the accuracy of a single score, but a range of metrics.
Are all Peloton bikes calibrated the same?
According to Jayvee Nava, the VP of Community at Peloton “All bikes are factory calibrated and Peloton bike sensors are accurate to within 10% of one another“.
This means you should expect some variance between one bike to another.
However, please remember that calibration is all about the position of the flywheel and magnet brackets.
So any changes within the bike that will disrupt its original position (e.g. if your brake or flywheel has been repaired) can impact the calibration.
Another thing that can impact the position of the flywheel is when your bike was shaken, damaged, tilted, or fallen to the ground.
What happens if I don’t calibrate my Peloton?
It is necessary to calibrate your peloton bike because you get more realistic feedback from your workouts and you can track your progress more precisely.
However, people who don’t track their numbers or leaderboard position should not worry about this.
For me, calibrating your bike is worth it. (It improves the overall Peloton experience.)
If you are actively using the metrics to track your progress, compete in the leaderboard, and plan your future workouts based on these numbers, then do it.
Plus, I think that if you pay $44/month for an all-access subscription membership (which includes leaderboard access, metrics history, and so on) you should take care of your calibration because those features are what you pay for.
I also think that people who don’t care about these numbers aren’t looking to get the Peloton bike in the first place.
Peloton Calibration Pros And Cons
Before I explain different ways of calibrating your bike, I wanna show you some pros and cons of doing regular calibration.
| Pros | Cons |
|---|---|
| Good for people who are driven by numbers. Good for people who needs to have accurate data. Good for people who are meticulous about their progress. Good if you want to compete with other members on the leaderboard. | Not good for people who are not familiar with the bike hardware. Not good for people who don’t care about numbers. Not good for people who can lose motivation after seeing unfavorable changes. |
One thing I wanna point out is that recalibration will affect the overall numbers.
This means some people who are sensitive and find extrinsic motivation from their numbers on the leaderboard may feel discouraged and give up after seeing a sudden drop.
On the other hand, if the bike is under-calibrated and the numbers indicate lower performance, adjusting the bike may spark motivation because the numbers will get higher than before.
How often should you calibrate your Peloton?
A peloton bike or tread may require calibration at least once every 6 to 12 months to ensure the correct accuracy.
Also, it is advised to recalibrate your bike every time you move it around, and if you feel that your numbers are getting off.
However, the peloton states that “outside of very specific circumstances that the Peloton Support Team can diagnose, there is no need to calibrate again“.
Peloton recommends calibration
The peloton allows for home calibration but it doesn’t recommend doing it on your own.
However, if the members decide to calibrate their bikes, they recommend reading the instructions thoroughly and walking through the process slowly.
In other words, unless you suspect some type of mechanical misalignment of your bike, there is no need to recalibrate your bike on regular basis.
However, I had to calibrate my bike multiple times due to a power outage in my neighborhood. Plus, I was moving my bike into the garage, and to be sure I did not mess up anything I had to go through it again.
In fact, I recalibrated my bike two weeks ago and noticed a huge difference in my performance right away.
So I do recommend doing it regularly because peloton calibration change over time.
On the other hand, I know a handful of people who didn’t recalibrate their bikes and never heard anyone complain.
The calibration of the peloton bike+ takes less than a minute.
It has an auto-calibrate feature.
However, the calibration of the original peloton bike takes no longer than 20 minutes because you have to go through the process manually.
Does Peloton Auto Calibrate?
The peloton bike+ has the auto-calibration option, which allows you to automatically do the calibration process directly from the screen. You can start auto-calibration by going into the device setting and choosing the home recalibration in the bottom left corner.
I explain this process later on in this article.
Does peloton original auto calibrate? In short, the peloton original doesn’t have the option to auto-calibrate, which means you have to use calibration tools like wedges and discs. The calibration wedge goes on the flywheel and calibration discs sit on the resistance knob.
What is the peloton calibration kit? A peloton calibration kit is a set of plastic accessories that allow you to recalibrate the bike. The calibration kit is only useful for the original bike and is not recommended for bike+.
There are three calibration tools that you need for the peloton original:
- Wedge
- Small disc
- Large disc
The calibration wedge is a small piece of white plastic that is included in the peloton calibration tools. It looks like a cap that sits directly on the flywheel, just between the two magnet brackets.
The calibration discs are two separate pieces of white plastic that need to be placed between the dial and bold on the resistance knob.
How To Get A Peloton Calibration Tool?
As a whole, you get peloton calibration tools delivered together with your bike during the initial delivery and setup. However, if for any reason you don’t have the kit, you can order them directly from the peloton.
The only problem is that the peloton sends the calibration tools but it does not attach any instructions on how to use them.
Now, the peloton does give the bike and bike+ instruction manual, but they do not provide any information about the calibration. The only instructions available are on the peloton screen after you activate the sensor calibration menu.
How much do the peloton calibration tools cost?
Relax.
The calibration tools are free of charge. However, if you’re not familiar with how to recalibrate your bike, you need to make an appointment with the peloton representative.
If you have an extended warranty it’s free, but if you don’t have an extended warranty it’s $100.
Requesting an appointment with the peloton support team is relatively easy and they do an amazing job of explaining how the calibration process works.
If you have any questions about the bike, I recommend having a list of queries prepared, as well as recording a video on how it’s done so you can always repeat the process on your own, even if you’re not an expert.
How to calibrate the original Peloton bike?
Here you can see the video on how to calibrate the original peloton bike and how to use calibration tools.
To calibrate your peloton bike you will need a 3mm Allen wrench, calibration tools, and a screwdriver. Here are the step-by-step instructions.
- Take off the water bottle cup and remove the sweat guard from the front shroud using the screwdriver and Allen wrench.
- Take off the plastic cover. This will give you full access to the front of your bike’s flywheel.
- Turn the resistance knob to the left. This will elevate the brackets and make space for the wedge.
- At the same time, place the peloton calibration wedge on the edge of the flywheel and push it toward the magnet brackets until you feel slight friction.
- On your resistance knob, elevate the black sleeve under the knob and place the larger disc on top of the bolt.
- Rotate the disc until it locks on the bold and slight down.
- Take the second (smaller) disc, lift the black sleeve again, and place the smaller disc on top of the large disc.
How to get to Peloton calibration screen
Once you attached the calibration tools to the flywheel and the resistance knob, the next step is to open the peloton screen and open the calibration screen menu.
This is tricky because there is no specific option or tab on the screen so you have to follow the instructions below.
- On the peloton screen, go to options and choose the “About” tab. This will open the information box about the peloton bike.
- Tap your finger 5 to 7 times on the top right corner to activate the sensor calibration menu.
- Once the sensory calibration menu opens, press “get started” and follow the instructions.
How to calibrate Peloton without a tool?
In general, you can calibrate the original peloton bike without the tools, but you will need alternative accessories like measuring tape and a ruler.
Here you can see the tutorial video on how to recalibrate peloton bikes without the wedge.
You can calibrate peloton bikes without discs.
Take sticky tape and put two pieces on the resistance knob. One in a vertical position, the second one in horizontal.
Take a pen and mark four corners on the tape, which will indicate the position of the knob.
What if things go wrong?
The bikes can be calibrated wrong if the calibration process was done poorly.
If you have any issues and you suspect that your bike is off, or you are not sure how to calibrate it on your own is better to set up an appointment with the peloton support team.
People who are not kinesthetic learners and are not used to repairing things manually may have a difficult time fixing peloton calibration on their own.
How to calibrate Peloton Bike Plus?
This one is easy.
Calibrating peloton bike plus is more convenient than an old bike because it has the auto-calibration feature.
- Get off the bike and do not touch the resistance knob, as well or as the pedals during the process.
- On your peloton bike+ screen, press the three dots icon on the bottom right corner. This will open the slider menu on your right side.
- Select the “device settings” tab at the bottom of the list.
- Select the “home calibration” option on the bottom left corner. This will open the auto-calibration menu.
- From the auto-calibration menu, press the red icon where it says “start calibration”. The process of auto-calibration will take less than a minute.
As you can see, the auto-calibration of peloton bike+ is straightforward and doesn’t require any tools. However, sometimes people encounter issues when calibrating their bikes at home.
Troubleshooting
Some of the most common calibration issues with peloton include having the resistance feel either too hard or too easy.
This is an indicator of calibration error and you should contact the peloton support team.
Sometimes you may notice discrepancies in the output.
The reason why peloton output is getting worse can be due to over or under-calibrated bikes.
As a general rule, the power output in a properly calibrated bike should display 215 watts at the cadence of 100 rpm and 45 resistance level.
These are the number I got from the peloton representative.
Conclusion
Every piece of cardio equipment like treadmills, bikes, or ellipticals that comes with a screen where you can see numbers like resistance, speed, or incline have built-in sensors.
These sensors need to be calibrated and match the actual resistance.
As you can see, if you don’t calibrate your peloton bike it will provide you the incorrect data about your resistance.
This misleading information can lead to inaccurate and false conclusions about your current fitness level, leaderboard position, and progress.
Calibrating peloton bike plus is relatively simple. The biggest problem is with the peloton original.